Introduction
Welcome!
In this manual, you will find clear and precise explanations on how our platform Ledpilot works. Our application allows you to manage and create content for all types of screens in record time and remotely.
General operation
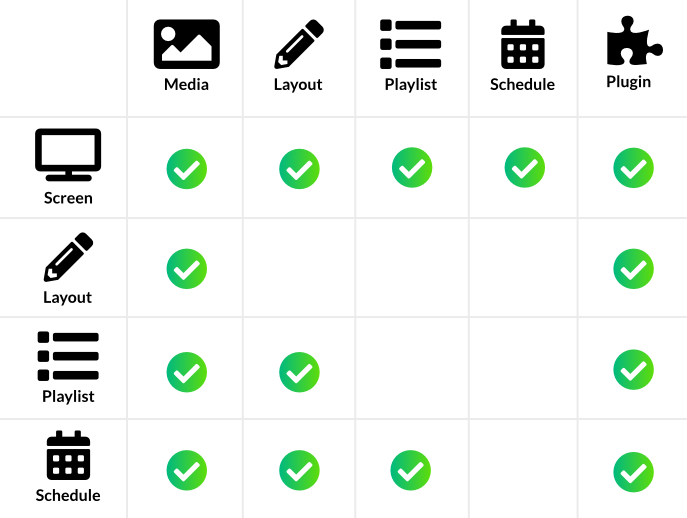
Our platform works in a very simple way. Keep in mind that you need to assign content types to each other. For example, you can assign a media to a screen You can also assign a plugin (weather for example) to a layout and then assign your layout to a screen
Below is a summary:
Dashboard
Presentation
Virtual Screens
Virtual screens allow you to link the physical player to the online administration interface, using a unique ID number.
When you assign content to a virtual screen, the physical player is updated in real time. You can assign several different types of content depending on your needs:
- Media
- Page layout
- Playlist
- Agenda
Create a virtual screen
- go to the page
- click on the button
- fill in the required fields (name, description)
click on advanced settings to configure the advanced options
- Resolution
- Brightness
- Transitions
WARNING: the Media Adaptation function allows the application to use all available space. Be careful when your screen is in portrait mode
Link content to a virtual screen
- click on the content button to choose the type of content to link to the virtual screen
- save
Here are the available content types :
- Media: image / video
- Layout
- Plugins
- Playlist: alternating media / layout / plugins
- Agenda: schedule of media / layout / playlist / plugins
When you select playlist or agenda, you have the possibility to choose an in transition (in transition) and an out transition (out transition)
See the boxes connected to the virtual screen
- click on devices to see all connected devices
- click on the device name for more details
Preview content
- click on view
- a new window will open with the content of your screen
- remember to disable your popup blocker
Playlist
Create a playlist
- Go to the Playlists page
- Click
- Choose a name
- Click
Add content to a playlist
- Go to the playlist page.
- Click on content
- Choose the type of content: media / layouts / plugins
- Click the add button to add the item to the playlist
Once the items are added, you can change the display time for each item individually
Delete content from the playlist
- Select the content you want to delete
- Click on the little trash can
Delete a playlist
- Choose the playlist you want to delete
- Click
CAUTION: Only delete a playlist if it is not assigned to a screen
Calendars
Create an agenda
- Go to the Agenda page
- Click on
- Fill in the required fields
Adding content to the agenda
- Start by drawing a time slot
- Double click on your time slot
- Select the content tab
- Choose the type of content: media / layouts / plugins / playlists
- Choose the content to broadcast
Create recurrences
- Double-click on the time slot
- Choose the tab Duration & recurrence.
- Select a start date and time
-
Select the type of recurrence
- No recurrence
- Daily
- Weekly
- Monthly
- Yearly
- Choose an end date
Delete content from the schedule
- Double-click on the time slot
- Click on Delete
Delete a schedule
- Choose the schedule you want to delete
- Click
CAUTION: Only delete a schedule if it is not assigned to a screen
Media Library
Add media
From your computer
- Click the button.
- Choose the first tab Computer
- Click on the icon
- Select the files to send
- Change the size of the images (optional)
- Click on
From a website
- Click on the button.
- Choose the URL ongler
- Type or paste the URL of your media
- Click on add
- Click
Please make sure to respect the supported media formats Images: jpg, gif, jpeg, png, svg Videos: mov, mp4, wmv, webm, avi
WARNING: The .mov format with the Apple ProRes codec is not supported
WARNING: Try to adapt the resolution of your media to the resolution of your screen. For example it is not interesting to add a 1920x1080 media to be displayed on a 384x240 LED screen
Delete media
- Choose the media to delete
- Click on the trash
CAUTION: Only delete media if it is not being used.
Organize media
Create a folder
- Click
- Give it a name
- Click
Delete a folder
- Click on the recycle garbage can
CAUTION: If you delete a folder containing media, all media will be deleted as well!!!
Layouts
Layouts are a way to mix several different types of content. So you can decide to create multiple zones and arrange them as you see fit.
Each area can host your choice of: text, animated text, media (images / videos) and plugins (dynamic content).
Create a layout
- Go to the page Page Layouts.
- Click on
- Fill in the required fields
- Choose a name
- Choose a duration
- Choose an image and a background color
- Click
Edit a layout (layout)
Create zones
- Go to the zone tab in the right column
- Click on
- Choose the content type
Use pre-configured zones
- Click on the little star in the top bar
- Choose a configuration
Add content to an area
- Double click on a zone or click on the Settings tab in the right column
- Choose a content type
- Empty: An empty area can be used as a background
- Artistic Text: Text that fits the size of the area; commonly used for titles
- Framed Text : The size of the text is variable; very used when you have a lot of text to add
- Animated text: Works like the framed text with some extra animation. You can choose the type of animation (letter by letter or word by word)
- Media: Choose the media to add from your media library
- Plugin: Choose an existing plugin, or create a new one
- Shape: Use predefined customizable shapes to embellish your layouts
- Table: A table of data; text or images
TIP: Find the most used parameters in the quick edit bar at the top of the screen
Delete a zone
- Click on the tab fields in the right column
- Check the zone(s) you want to delete
- Click on the recycle garbage can
Select a field
- Click on the zone in the editor or in the zones tab in the right column
Style a zone
- Select a zone
- Click on the Settings tab in the right column
- Click on the Styles tab
- Change the style settings
Animate zones
- Select a zone
- Click on the Settings tab in the right column
- Click on the Transitions tab
- Change the settings for the transitions
- Input transition: this transition is launched when the layout is displayed
- Exit transition : this transition is launched before the layout disappears
- Time : animation curve of the transition
- Duration : total duration (in milliseconds) of the animation
- Delay : delay (in milliseconds) before the animation is launched
ATTENTION: Animations only work if the layout is used in a reading list or in a calendar
Pre-configured animations
- Click on the magic wand in the top menu
- Each zone now has a default animation
Delete all animations
- Click on the eraser in the top bar
Position and align zones
- Select an area
- Click on the Settings tab in the right column
- Click on the Positions tab
- Change the position settings
Preview a layout
- Click on the button in the top bar to start the animations
- Click to stop them
Delete a layout
- Choose the layout you want to delete
- Click
CAUTION: Only delete a layout if it is not assigned to a screen
Organize layouts
Create a folder
- Click
- Give it a name
- Click
Delete a folder
- Click on the recycle garbage can
WARNING: If you delete a folder containing layouts, all layouts will be deleted as well!!!
Plugins
Plugins are dynamic content only available in layouts.
Create a plugin
- Go to the store page
- Choose the plugin you want
- Give a name to your plugin instance
- Click
Delete a plugin
- Choose the plugin you want to delete
- Click delete
WARNING: Only delete a plugin if it is not assigned to a layout
In case of problems
Contact us
If you encounter a problem with the application, consider checking this :
- Your Internet connection
- The computer's Internet connection
- The date and time of the computer
You can also contact our technical support at the following address: support@ledpilot.eu